HOW PENIS FILLER WORKS
A Simple Process Designed for Convenience
At The Girth Guru, we've made the process as straightforward as possible. Whether you're new to our products or a returning customer, getting started is quick and easy.
Non-Surgical Penile Girth Enhancement Explained - Step-by-Step Instructions
What Is Penis Filler?
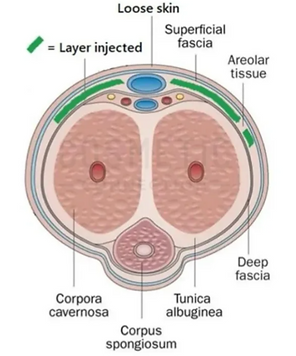
Penis filler is a cosmetic enhancement technique that increases the girth (thickness) of the penis by placing a specially formulated hyaluronic acid gel beneath the skin of the shaft.
Hyaluronic acid is widely used in aesthetic medicine and works by:
-
Adding immediate volume
-
Attracting and retaining moisture
-
Integrating smoothly with surrounding tissue
The result is a thicker, fuller appearance with natural feel and flexibility.
How Girth Guru Penis Filler Works
Our penis filler kits are designed using hyaluronic acid filler principles commonly used in professional aesthetic settings, but in a format intended for private, at-home application.
-
Clear instructions and support
-
Designed for private, at-home use
We focus on transparency, education, and quality — no hype, no false promises.
This page explains how penis filler works, what results to expect, how long it lasts, and why many men prefer hyaluronic acid filler over surgery or fat transfer. You’ll also find our how-to video demonstration and learn why thousands trust Girth Guru for private, at-home enhancement.
At Girth Guru, we specialise in non-surgical penile girth enhancement using professional-grade hyaluronic acid (HA) penis filler kits designed for discreet, at-home use.
Please only follow this guide for Girth Guru Penis Filler. It should not be used for facial fillers or other filler products. Full instructions are included with every kit. Our Penis Filler has had years of research and is made exclusively for penile use, other low-quality fillers could cause serious issues. (This webpage is a simple guide only and should not be followed without reading the included instruction booklet first)
Step-by-Step: The Procedure:
The steps below provide a high-level overview. Full procedural guidance is supplied with each kit.
Our at-home process mirrors what takes place in professional clinics, but is adapted for private, self-application with clear guidance and support.
The steps below provide an overview of the process, with full instructions and visual guidance supplied inside your kit.
Step 1: Numbing & Comfort
A numbing cream containing lidocaine is applied along the shaft to help minimise discomfort during the procedure.
-
Allow approximately 20–30 minutes for the area to become numb
-
A cool wrap may optionally be used to further desensitise the area
-
Many users report the process is virtually painless, often experiencing only mild pressure sensations
Proceed once the area feels sufficiently numb.
Step 2: Preparation
Proper preparation is essential for hygiene and smooth application.
-
Clean the intended entry points thoroughly using the included alcohol wipes
-
Typical entry points are demonstrated clearly in the included video and diagrams
Prepare the filler by:
-
Opening the penis filler vial by removing the safety seal and cap
-
Using the supplied siphon needle and syringe to draw the required amount of filler
-
Attaching the micro-needle securely to the syringe
This preparation stage ensures the filler is ready for controlled placement.
Step 3: Placement (Filler Application)
A small entry point is created using the provided micro-needle. This opening is minimal and designed only to allow insertion of the cannula.
-
The blunt cannula is then attached to the syringe
-
A blunt cannula has a rounded tip that slides beneath the skin without cutting tissue, helping reduce discomfort and minimise trauma
The cannula is gently guided beneath the skin along the shaft. Filler is distributed gradually as the cannula is withdrawn, promoting even coverage.
-
The process is typically repeated on the opposite side of the shaft
-
Larger kits may be applied over multiple entry points or sessions, using the same controlled technique
Detailed visual demonstrations are included to guide correct placement and distribution.
Step 4: Shaping & Smoothing
After placement, the filler remains malleable for a short period.
-
Gentle massage is used to help distribute the filler evenly
-
This process helps achieve a smooth, uniform appearance
Massage is typically performed using both hands, gently rolling the shaft to assist even distribution along its length
Step 5: Recovery & Aftercare
Once the procedure is complete:
-
Clean the entry points again
-
Apply the included plasters if needed (often the entry seals quickly on its own)
During recovery:
-
Mild swelling or light bruising is normal and usually subsides within a few days
-
Most users resume normal daily activities quickly, often the following day
It is recommended to:
-
Avoid sexual activity or vigorous masturbation for 10–14 days
-
Allow time for the filler to settle and swelling to fully resolve
Aftercare guidance is provided, including tips on support, comfort, and reducing temporary soreness, which typically fades within 48 hours.
How Long Do Results Last?
Results typically last 12 to 48 months, depending on:
-
Metabolism
-
Lifestyle
-
Amount of filler used
-
Whether top-ups are performed
Over time, the body slowly breaks down the hyaluronic acid. Many users choose top-up treatments to maintain or enhance results further.
Is Penis Filler Safe?
When used correctly and responsibly, hyaluronic acid fillers have a long history of cosmetic use.
Our kits include:
-
Professional-grade 22mg HA penis filler with the perfect balance
-
Blunt cannula technology (not sharp needles)
-
Sterile components for controlled application
⚠️ As with any cosmetic procedure, proper hygiene, technique, and aftercare are essential. Individual results and experiences may vary.
Important Notes & Guidance
-
The filler is designed to sit just beneath the skin
-
It should not be placed into deep tissue or blood vessels
-
Placement on the top of the penis should only be performed with confidence and reference to anatomical guidance
Detailed diagrams and explanations are included to support correct application.
Educational Notice:
This information is provided for educational purposes only. Results and experiences vary. Users are responsible for following all instructions carefully and ensuring appropriate hygiene and care. Detailed procedural guidance is provided within your kit and instructional materials.